Design
In 2025 there are so many options available to consider for any one storage design that I am sure even multiple books can or have been written on the topic. The primary goal of this project though will guide the design, and that goal was to increase storage space to 8TB or more. Because I have two 8TB drives, and two 1TB drives, I have some flexibility with my design, but not much. I could choose raw storage size, and just build each drive for maximum storage of up to 18TB, OR I could go for meeting the project goal of increased storage size while ALSO meeting the goal of server resilience by making each of the additional drives RAID1 drives or other options to fully provide a backup should one drive fail. In my old setup I had four 1TB drives in a RAID 0+1 configuration, which worked well, but really limited capacity. The new design will provide much more space.
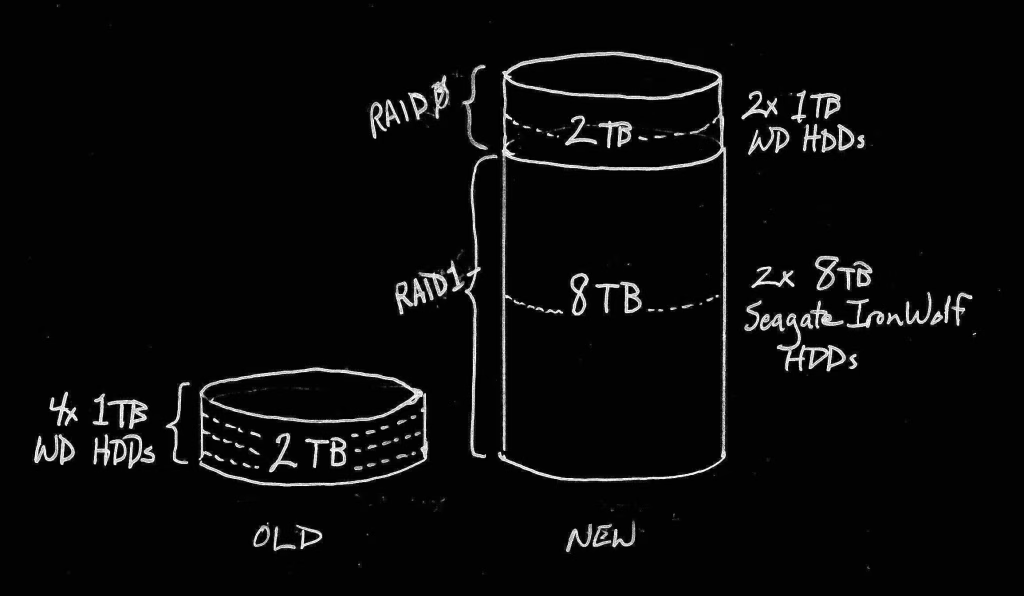
I chose to split the difference, and provide redundancy where it really counts, and provide capacity where redundancy is less important. Family photos, videos, and favorite audio files take up a lot of space, cannot afford to be lost, and should a drive fail are hard to keep backed up externally due to bandwidth and cost limitations. Therefore, these files need to be placed on the 8TB drives, but both 8TB drives will be placed into a RAID1 configuration. RAID1 provides full data parity, meaning that if one drive fails, the data is mirrored on the partner drive. This isn’t my backup solution, but it does provide some measure of reliability since I can replace a single failing drive before needing to resort to full data backup restoration of data.
The two 1TB drives, however, will be placed into a RAID0 configuration which provides data striping – writing data to both drives in parallel – meaning that I gain maximum performance and maximum drive capacity (2TB) out of these two drives. But I don’t have reliability. If one drive fails, the data on both becomes likely unrecoverable. So how will I use the 2TB of space? Answer: as a Bitcoin blockchain storage location. Although it will likely take a few days (yes, days) to download and verify the entire Bitcoin blockchain on these two drives I will have the space to store it without directly impacting the read/write frequency of the two 8TB drives. Additionally, I could perform incremental backups of the blockchain to the 8TB drives if needed, or in preparation for replacing these two 1TB drives in the future. I have a few extra 1TB drives as well (remember that old Drobo 5N I spoke of in the first article in this series? – they’re from that rig) to swap in for both should even one fail which makes this a viable option for my situation.
I considered other designs, such as mergerfs + SnapRAID, or ZFS, but in the end I decided to keep my design simpler for two reasons:
- If disaster strikes in the future or if a drive fails, I want to be able to recover fairly quickly and with very reliable, simple methods. RAID1 gives me that option.
- The less complicated the design, the less likely it will be for me to mess it up! I don’t want to rely on my staying on top of software updates, changing configurations, and details of software-driven hardware storage options like ZFS or SnapRAID, so I’m going to use the much longer lived, if less performant, RAID approach.
Drive Partitioning
Let us note now that I am not a complete newb when it comes to new and improved technology. I know that there are more drive partitioning schemes and file system types than FAT32. I will be partitioning my HDDs for RAID0 or RAID1 (as described above), but will be using BTRFS for all four HDDs. BTRFS is a newer filesystem type, but it appears to have some nice features for maintaining reliability of a drive, and it is supposed to perform better than older filesystem types as well.
I’ll begin by using the parted program on my NixOS install to reformat and partition my drives. I realized early on that drives over 2TB in size require newer drive management tools than the old standby of fdisk. You can use parted from within a Nix ad-hoc shell, but I chose to add it to /etc/nixos/configuration.nix so that I could always have it available in the future. (I would like to continue to expand the drive space, and besides, it would come in handy when I build another server with even larger drives using my custom-rolled NixOS ISO – more on that later.)
To partition my two 1TB drives, I followed this pattern:
$ sudo parted /dev/sda
GNU Parted 3.6
Using /dev/sda
Welcome to GNU Parted! Type 'help' to view a list of commands.
(parted)
At the (parted) prompt, the print command will display the state of the currently selected drive. My drive is already formatted as of the writing of this guide, but this is what would be shown initially:
(parted) print
Model: ATA WDC WD10EZEX-60W (scsi)
Disk /dev/sda: 1000GB
Sector size (logical/physical): 512B/512B
Partition Table: unknown
Disk Flags:
The first step is to set the Partition Table using the command mklabel. Although my 1TB drives could be partitioned with an msdos option, I chose to use the newer standard partition table option, gpt, like so:
(parted) mklabel
New disk label type? gpt
Provided your drive is clean, when you search for the free space on it using the following command, you should see that no partitions yet exist (only the partition table has been created at this point in time):
(parted) print free
Model: ATA WDC WD10EZEX-60W (scsi)
Disk /dev/sda: 1000GB
Sector size (logical/physical): 512B/512B
Partition Table: gpt
Disk Flags:

Number  Start   End     Size    File system  Name     Flags
        0.0kB   1000GB  1000GB  Free Space
The next thing we will do is assign an actual partition to the drive using the mkpart subcommand within the parted command line program. If I was making multiple partitions, that can be done at this stage as well, but I have found that this is generally less valuable than allowing a Linux system to directly manage folders on the biggest drive partitions possible. The only notable exceptions are separating out data from main Linux subsystem folders by placing /home, /var, or /opt folders on separate drives from the main OS drive, but we can cover those details later.
You can use parted‘s CLI interface by just calling mkpart without any options, but it saves time to use the simple options listed in the help: mkpart PART-TYPE [FS-TYPE] START END.
(parted) mkpart primary ext4 1M 1000GBNotice above that I chose the File System Type as ext4 instead of accepting the default of ext2 , and that I did not choose another option like btrfs. This choice was deliberate to make supporting these drives from any given distribution easy, even if my current NixOS install fails at some point. I want these drives to perform reliably and often since they’ll be constantly working with the full Bitcoin blockchain, so simpler is better in this situation.
Also notice that I specified a start of the partition at 1M, or a 4096 byte offset from the beginning of the drive. On an SSD or NVME type drive, this wouldn’t matter, but on spinning disks such as my Western Digital or Seagate HDDs, this can be helpful in aligning the first read sector to where the magnetic pin is positioned before the drive starts spinning. (I think that is so… of course, will saving 100ms of time and maybe 1 extra hour of HDD lifetime or whatever the theoretical benefits are be worth it? … who cares! – Correct me in the comments)
Now check your partition to ensure you actually created the partition successfully:
(parted) p
Model: ATA WDC WD10EZEX-60W (scsi)
Disk /dev/sda: 1000GB
Sector size (logical/physical): 512B/4096B
Partition Table: gpt
Disk Flags:

Number  Start   End     Size    File system  Name     Flags
 1      1049kB  1000GB  1000GB  ext4         primary
I then repeat these steps for my /dev/sdd 1TB drive so that both drives appear identical.
NOTE: I am not a drive partitioning expert, and the above steps may be unnecessary if you are proceeding on to build a RAID array, as I am. When creating the RAID arrays I get similar messages about wiping out data and re-partitioning the drives from the mdadm program, so take everything I do here as simply steps I followed which may or may not be necessary for your individual situation.
Building a RAID 0 drive array
Remember that I want these two 1TB drives to provide maximum capacity, and that redundancy is not important because of how I intend to use them.
Now we need to switch over to using the mdadm command to initialize the RAID array. But first, I needed to create mount points for my RAID array. NixOS doesn’t automatically have a /mnt directory, so I created one as root. Then I created a subdirectory in the /mnt directory which I chose to name md0-btc. You could choose to name it whatever you wish, like so:
sudo mkdir /mnt
sudo mkdir /mnt/md0-btc
Now I entered an ad-hoc nix-shell environment to run the mdadm program to create the RAID array:
sudo nix-shell -p mdadmFrom within this ad-hoc shell environment, I ran the following:
sudo mdadm --verbose --create /dev/md0 --level=raid0 --raid-devices=2 /dev/sda /dev/sdd
That step generates the device under /dev, and sets it to be a RAID0 device consisting of the /dev/sda and /dev/sdd drives (my 1TB drives). Now we can issue the command sudo mkfs.ext4 /dev/md0 to generate the necessary filesystem accounting info that our system will need in order to mount our RAID array during system initialization.
[caveman@orion:~]$ sudo mkfs.ext4 /dev/md0
mke2fs 1.47.1 (20-May-2024)
/dev/md0 contains a ext4 file system
        created on Sat May 24 06:09:25 2025
Proceed anyway? (y,N) y
Creating filesystem with 488314368 4k blocks and 122085376 inodes
Filesystem UUID: 3167f30d-d160-4863-bc2f-ef1b21119e22
Superblock backups stored on blocks:
        32768, 98304, 163840, 229376, 294912, 819200, 884736, 1605632, 2654208,
        4096000, 7962624, 11239424, 20480000, 23887872, 71663616, 78675968,
        102400000, 214990848

Allocating group tables: done
Writing inode tables: done
Creating journal (262144 blocks): done
Writing superblocks and filesystem accounting information: done
Other guides for Ubuntu or other distributions will talk about editing your /etc/fstab file to add the new RAID /dev/md0 as a mount during startup; however, NixOS doesn’t allow users, even superuser root accounts, to do this because everything is managed from the Nix config file at /etc/nixos/configuration.nix, and this is a good thing for this project.
Now I edit the /etc/nixos/configuration.nix file as root (sudo vim /etc/nixos/configuration.nix – or sudo nano /etc/nixos/configuration.nix if you haven’t installed and like the vim text editor, as I do) to add the following to your configuration:
fileSystems."/mnt/md0-btc" =
  { device = "/dev/md0";  # mount /dev/md0 RAID0 WD 1TB drives
    fsType = "ext4";
    options = [ "nofail" "raid" ];
  }
We can test that our new configurations are working properly by first rebuilding our NixOS system. Technically, “switching” is fully switching to the new configuration, which is living dangerously, but you can run sudo nixos-rebuild test first and if all is successful, switch after that:
$ sudo nixos-rebuild switch
building Nix…
building the system configuration…
activating the configuration…
setting up /etc…
reloading user units for caveman…
restarting sysinit-reactivation.target
If you didn’t encounter errors, then see if your new RAID array is mounted using the lsblck command:
$ sudo lsblk
NAME        MAJ:MIN RM   SIZE RO TYPE  MOUNTPOINTS
sda           8:0    0 931.5G  0 disk
└─sda1        8:1    0 931.5G  0 part
  └─md0       9:0    0   1.8T  0 raid0
sdb           8:16   0   7.3T  0 disk
└─sdb1        8:17   0   7.3T  0 part
sdc           8:32   0   7.3T  0 disk
└─sdc1        8:33   0   7.3T  0 part
sdd           8:48   0 931.5G  0 disk
└─sdd1        8:49   0 931.5G  0 part
  └─md0       9:0    0   1.8T  0 raid0
nvme0n1     259:0    0 238.5G  0 disk
├─nvme0n1p1 259:1    0   512M  0 part  /boot
└─nvme0n1p2 259:2    0   238G  0 part  /nix/store
                                       /
I proceeded to follow-up the build of my two Seagate 8TB drives following the same steps, but I partitioned them with the BTRFS filesystem and mounted the RAID array I created on /dev/md1 with the mount point /mnt/md1. In the next article I will begin building some simple backend services on my server which will provide the basis for the user-level services everyone wants to use.
References
- https://linuxconfig.org/how-to-partition-a-drive-on-linux
- https://askubuntu.com/questions/350266/how-can-i-create-a-raid-array-with-2tb-disks
- Seagate RAID Capacity Calculator
Leave a Reply
You must be logged in to post a comment.